
Interiors
How to put a gallery wall together
I am going to show you how to put a gallery wall together – one of the most eye catching styling features for a room. There is nothing worse than a large wall with just one or two small pictures on it. Without being in a group or with a reference point, they look lost and lonely and rather than being pleasing, the look to me is all wrong.
There is an art to hanging pictures, mirrors and photos and you need to think very carefully about the correct placement for each one. Before looking in detail at gallery walls, I have some simple rules to consider for any artwork or mirror that you want to hang:
- If you just have one small artwork then find a small wall to accommodate it. Remember to consider the ratio of wall to artwork so that the piece that you are hanging is in proportion to the space left around it. Negative space was one of the first things that I learnt in design. You must consider the blank space as well as the filled in area.
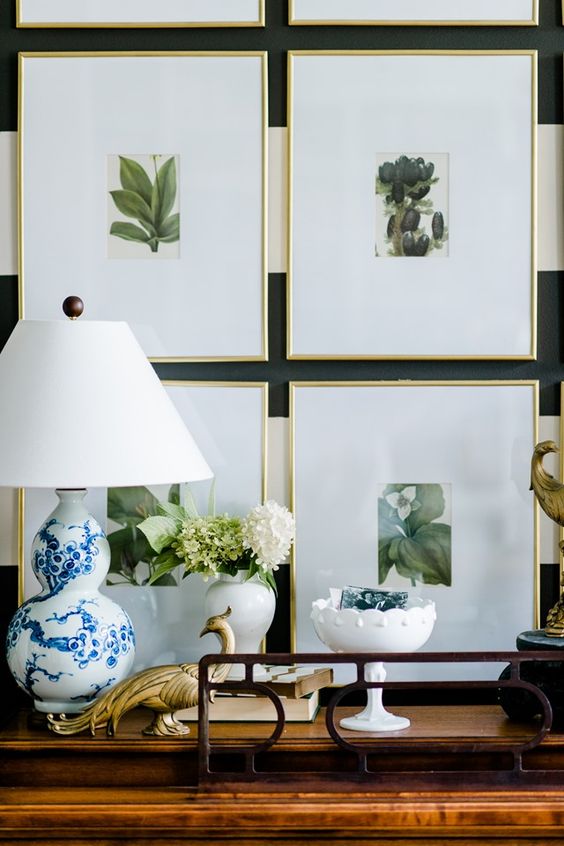
- Think outside the box. If you don't have a small wall, do you have an open space on a bookcase? Or do you have a piece of furniture – a sideboard or console table with a lamp and other decorating accessories. You can make the artwork part of this vignette so that it belongs to something.
- When hanging just one artwork on its own, ensure that you hang it at eye level (unless you are a family of extremely tall people, take the lead from someone of average height). As part of a vignette you can even hang it lower so that it is part of the group or simply prop it up on the piece of furniture.
- If the artwork is one of a pair then group them close together so that they are a pair rather than measuring a large wall and placing them equidistant apart. It is fine to take just part of the wall and group them rather than spreading them out and them ending up lost and lonely. You can perhaps take an armchair and floor lamp as your reference point and group it with those.
- If you have several pieces to hang, then rather than putting one on each available wall, consider putting them all together. This is a gallery wall and I can assure you will have more impact than a lost and lonely piece on its own.
I'm going to concentrate on a gallery wall for this post and how to successfully put one together. They often look just jumbled up and sometimes if you really have a good eye for placement, you can get away with this. But usually you will see that there is a system to something that just looks artfully put together.

I have a number of different diagrams to help you to put a gallery wall together:
All aligned gallery wall
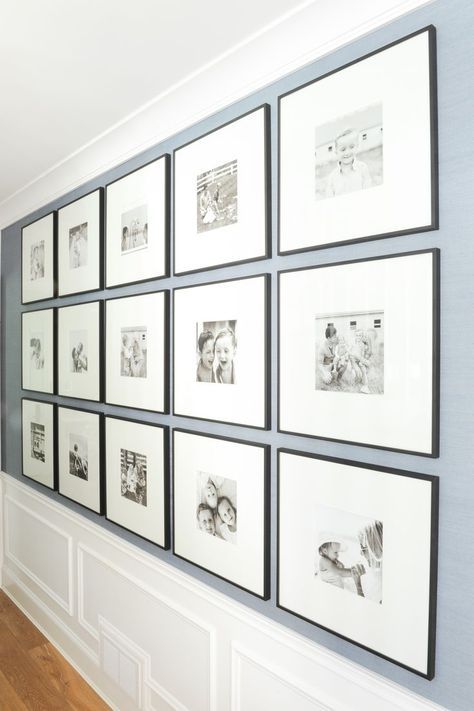
This is the most straight forward in terms of design. All the artworks are the same size and everything is lined up perfectly. Of course, this is not the easiest to install. If anything is out of line it will show so you will need patience and ideally a long spirit level with measurements marked.
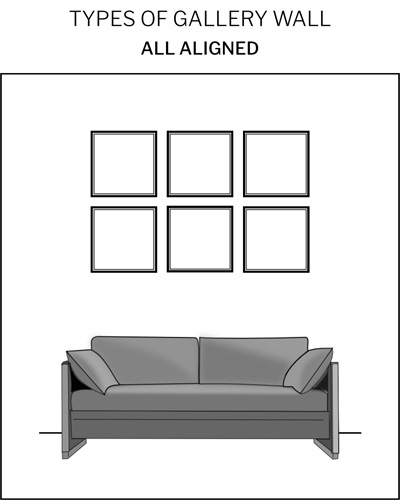
This type of gallery wall is effective with just 4 to 6 artworks but is absolutely stunning with several on one wall. An aligned gallery of 12-16 artworks, particularly if they are all on a theme, creates a fabulous wow factor. Perfect for those of us who like symmetry and order.
Clearly this can get quite pricey but you can opt for a budget solution with Ikea frames and a collection of beautiful inexpensive botanical prints. Or you can take your own photographs and have them framed.
You will need to measure the entire wall and work out the overall placement. Decide whether you want the distance between all artworks to be the same on the vertical and horizontal section. With an entire wall of images you need to very carefully measure to ensure everything will fit.
In the image below it works well to have a wider gap on the vertical than the horizontal line due to the rectangle size of the images but with square images, I prefer the vertical and horizontal gap to be the same width.

A gallery wall aligned to a centre point
There are several ways to use a central point to start a gallery wall:
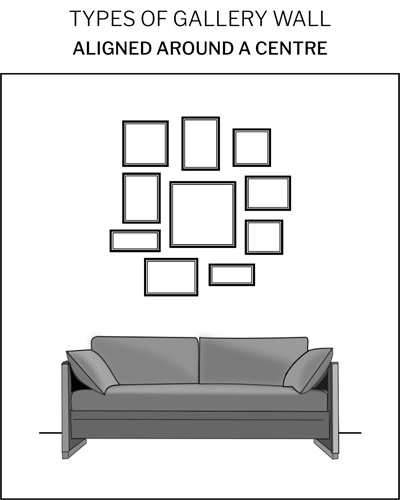
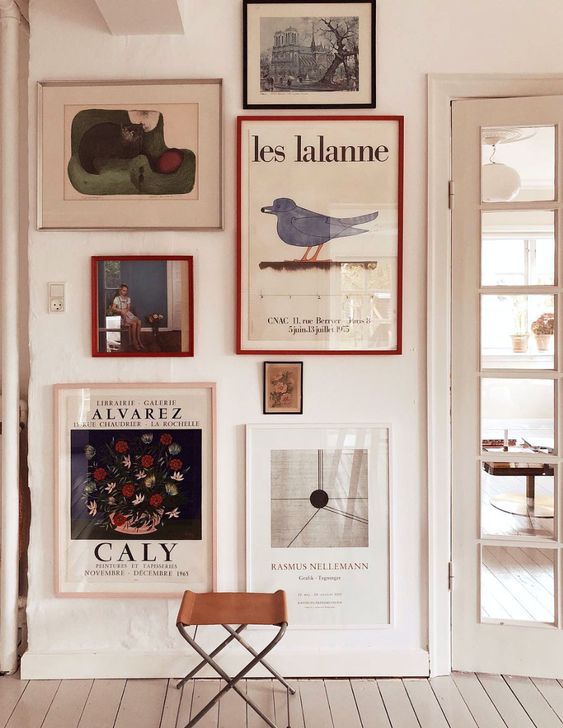
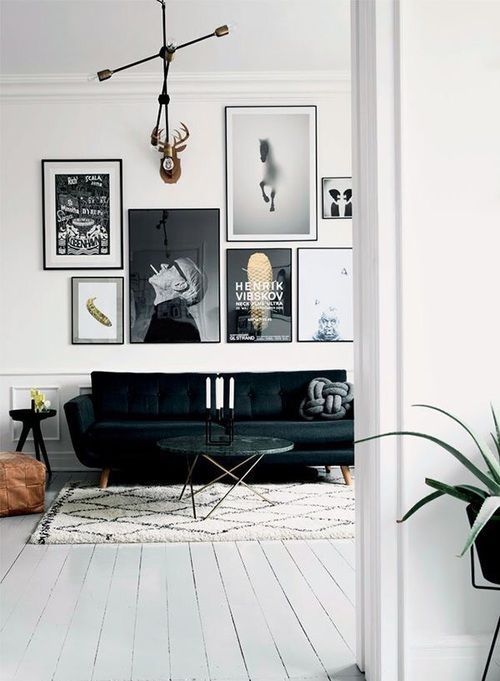
One large artwork in the centre as an anchor with the other artworks surrounding it. I generally like this centre artwork to be a statement piece or it could be something different like a mirror or a quirky piece, for example, a quotation.
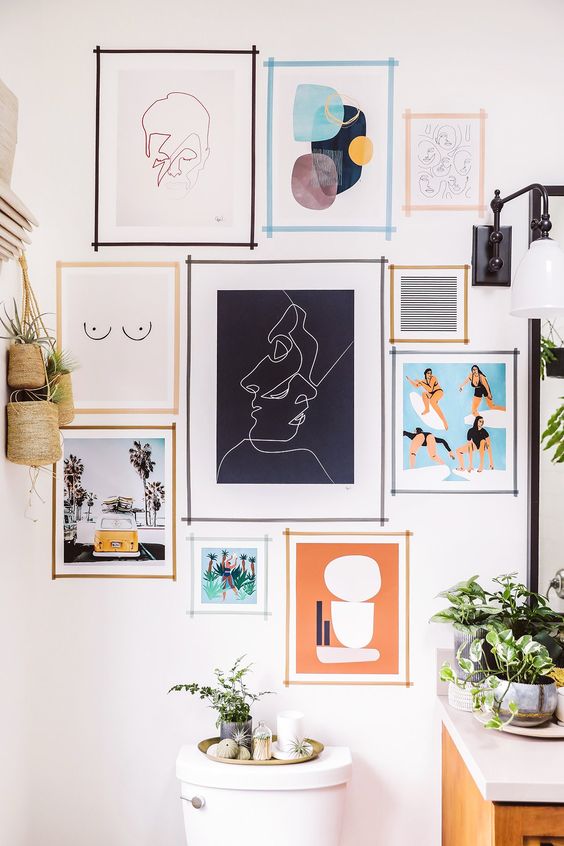
In the example above, the statement piece which is different to all the other artworks, is the very dark abstract artwork. This draws your eye in and anchors the collection of artworks.
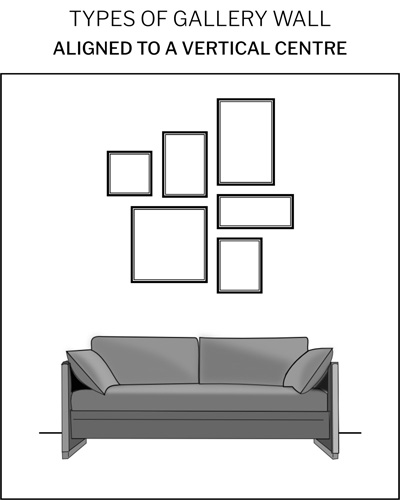
A vertical central line.
This doesn't have to be perfect, unless you are into everything perfectly lining up but you need to visually see a line happening to create a little order and balance. I find that groups of artwork with a vertical line work well on a section of a large wall. Because you have height in a wall, the vertical line suits this and it doesn't look odd to have it just to one side.
A horizontal central line.
Again, it can be almost implied or exact, depending upon your style and personality! This style is suited to a long hallway where you have a naturally long horizontal line.
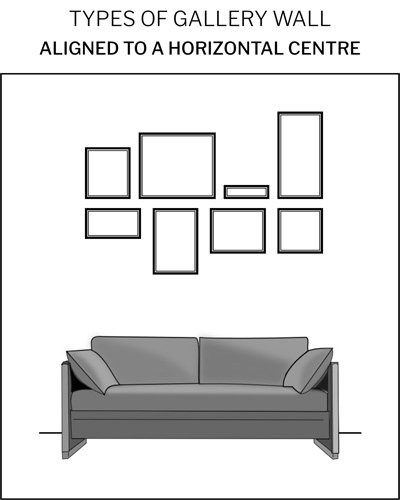
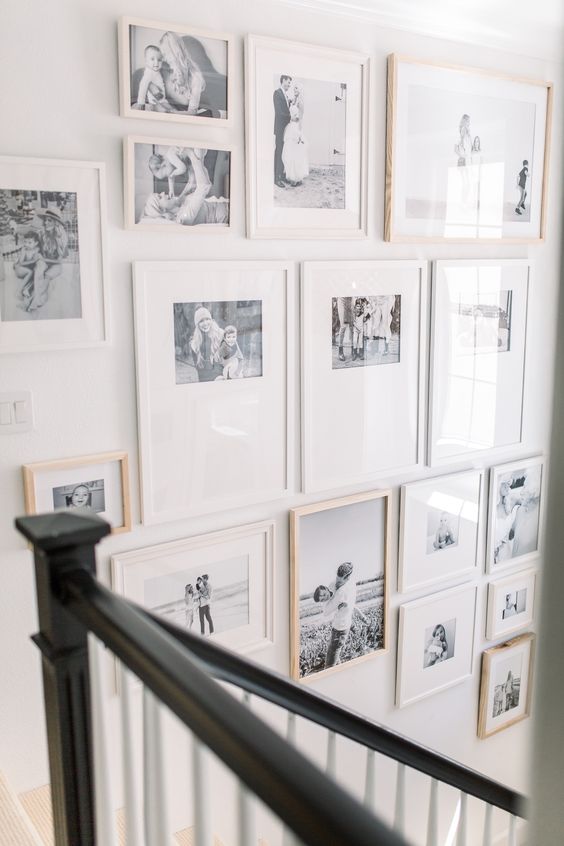
A gallery wall on a staircase will need several horizontal lines to fill the wall and move with you as you go up and down.
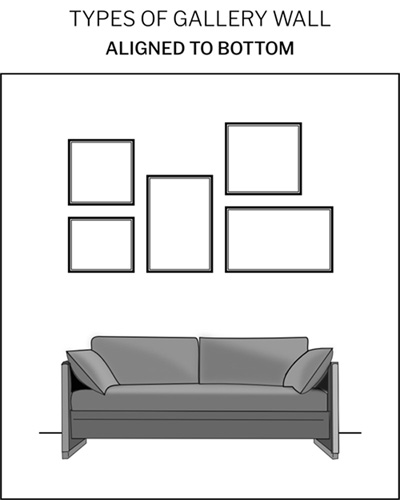
A gallery wall aligned to the bottom level
This is a simple but very effective starting point and works well over a piece of furniture or a sofa as there are two strong horizontal reference points. The artworks and mirrors can then lead up from this in any kind of jumble.
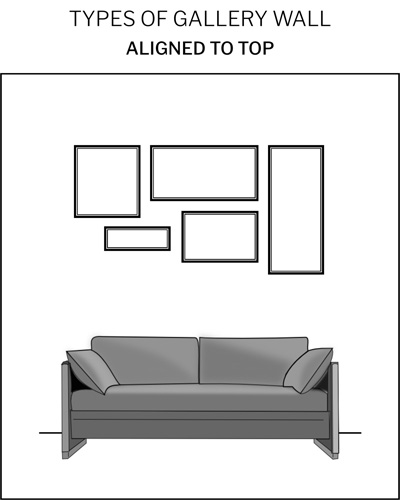
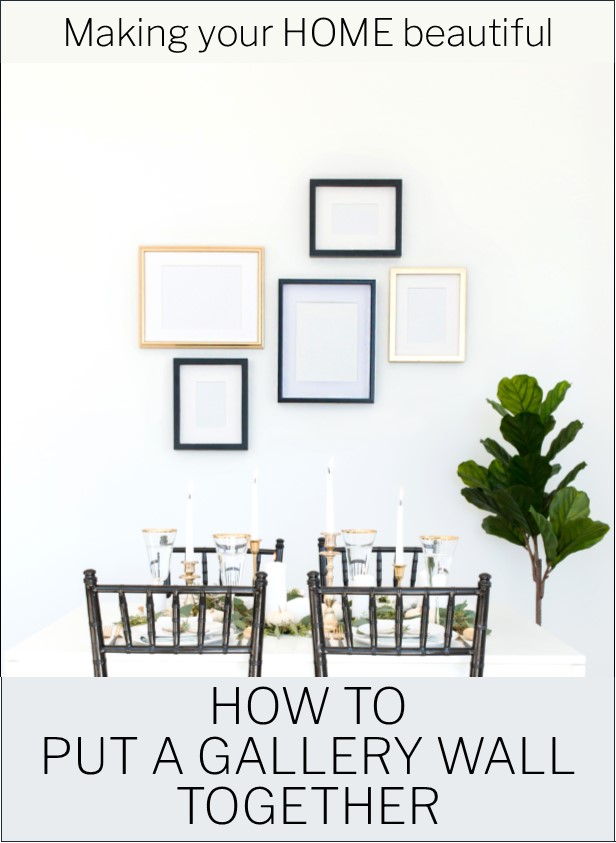
A gallery wall aligned to the top level
This style of gallery wall turns things on their head a little. We expect to have a solid foundation – just like building a house. So you get quite a different feel to your gallery wall if you anchor the artworks from a top line. Great for those of us who like life a little messed up!
There isn't a right or wrong just a different effect to create and this will depend so much on the style of the room and how you like items to be placed.
Framing artworks – whether to match or not
This really does come down to your personality, the style of the room and the type of gallery wall you select.
Generally with a gallery that is all aligned, the beauty is in the perfection and symmetry of the artworks and therefore it makes sense for them to be all framed in the same way. You will find that with an aligned gallery wall, the subject matter will probably be on a theme. Or it may be black and white family photographs. In either case, I like these to be framed the same.
With any other style of gallery wall, I find it can actually look better if the artworks are framed differently.
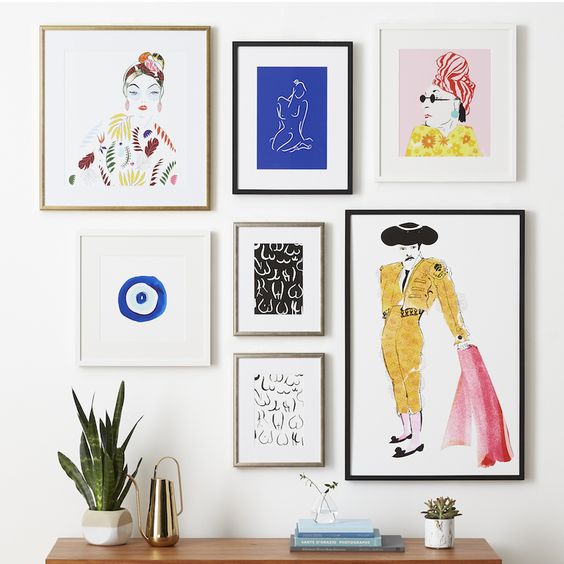
When it comes to framing an artwork, you really need to look at the piece of art and what suits it the best. The beauty of a large gallery wall that is jumbled up is that you are invited to meander past and look at the pieces individually. These type of walls provide you with lots of interest and it is preferable for each artwork to be individually appreciated and framed to suit, rather than framed for an overall look.
Finding a good place to start
When I am putting a gallery wall together I always lay the artworks on the floor first. I think about whether I would like them aligned at the top or bottom or to a central point and then try them all out in different positions until I get a look that I want to transfer to the wall.
More often than not I like to style them along some kind of implied horizontal or vertical line so that you get a jumble of artworks but on a closer look, the design has a foundation. In any case, this is a good guide:
- Assess the size of all the artworks.
- If you like to see some balance, don't put all the small ones on one side and the large ones on another.
- Look at the larger pieces. If you have more than one, consider using a vertical central point and having one on each side surrounded by the smaller artworks
- Look at how the artworks have been framed. One that has a dominant dark, heavy frame may be better as a central point. If you place it off to one side, your eye will forever be drawn to it.
- If you have more artworks framed in a dark frame than a light, consider the placement of these as they will create a line through the design – diagonal, horizontal, vertical etc. You may like this effect but if it is unintentional, then you may prefer to dot these particular pieces around.
- Look at the subject matter of the artwork. Does something really stand out? Is there a piece that is different to everything else? Perhaps a mirror or a quotation. Consider this being central to the design.
- If you can, leave the artworks laid out on the floor for a couple of days so that you can revisit it to ensure you like the layout.
A final point to remember. If you have enough artworks to make a really interesting gallery wall. Or if you have made a gallery wall from family photos. It is quite likely that you will want to build upon your collection. So consider too how you can add to the wall in the future – or start another one!
I hope that this has inspired you to put a gallery wall together – let me know if you have or you have any questions or comments below. I would love to hear from you.
You may prefer to hang large single artworks or you may like some walls that feature just one piece. I have a post to tell you all about how to display a statement artwork:
Related: How to display a statement artwork
Are you a keen photographer? If so you should consider turning your beautiful photos into canvas prints that you can display in your home. These are perfect for gallery walls and a fairly inexpensive way to introduce your unique style into the home.
Related: How to decorate with canvas prints
If you are looking at refreshing and restyling a room you should start with a mood board – I have a free e-book for you to download showing you how to put a mood board together. Download from my FREE Resource Library here.
This is so helpful! We are putting in a staircase and I wanted to add a gallery to the back wall. Thanks for the great ideas and visuals. I’m pinning this for sure!
Such a helpful and interesting article!!!!! A great guide that will help me in organizing my gallery wall perfectly!!!
Over the years I’ve purchased what I like. I’ve run out of wall space so a gallery is born. It doesn’t follow ANY rules but I love it more every day.
I really would like to compliment you on the above article….so helpful…thank you. I always get something out of your column, always so interesting
Thanks Dawn – great to hear Samantha
A great article Samantha with a lot of good advice. I have just had five architectural drawings (Giclee prints) that my great grandfather did back in 1880s England, framed. I’m planning to put them in my hallway using both walls – three grouped on one wall, and the other two on smaller walls, individually but close to each other and close to the group. It will take some thinking about but they will look pretty amazing when they’re up. Just wondering if I should arrange the group of three according to the top horizontal frame as they are all slightly different heights.
Hi Rosemary the prints sound beautiful – I think I would be inclined to use the bottom line as the starting point for the 3 different sized ones. Samantha